The Best Hangboards of 2024

It’s no secret that the popularity of climbing is actively booming. Gyms are popping up like weeds, and crag parking lots resemble camper van dealerships. The allure of the sport is clear — climbing offers a rare combination of exercise and social interaction.
Once hooked on the activity, the hunger for personal progression grows quickly. It doesn’t take long for an enthusiastic new climber to discover the hangboard. The hangboard is a compact training tool used to strengthen the fingers. With regular use, proper form, and an intentional training schedule, all of the hangboards on this list can help you shatter performance plateaus and improve as a climber.
For this review of the best hangboards of 2024, we tested over 11 boards over multiple seasons to determine the best of the best. We hung from our fingertips at the gym, at home, and at the crag — all in an effort to put together this list. Our testers include veteran climbers and training aficionados Matt Bento and Austin Beck-Doss, plus climber and strength coach Paul Mandell.
If you’re looking to begin finger strength training, you’ll likely want a board with large, comfortable, ergonomic holds. If you already have tendons of steel, you’ll want a board well-matched to your advanced skill set and training goals. Whatever your finger fitness level, this guide will help you find the right hangboard. Check out our comparison chart, buyer’s guide, and price and value sections below.
Editor’s Note: This guide received a big refresher on September 18, 2024. The rock-solid Beastmaker 1000 takes our best overall award, and we also got to test the Rock Prodigy Natural, which allows for on-the-fly width adjustment and has a unique selection of tapered edges and pockets. And for precise, isolated crimp strength training, check out the very portable Tension Block.
The Best Hangboards of 2024
- Best Overall Hangboard: Beastmaker 1000
- Best Budget Hangboard: Metoloius Wood Grips II
- Best for Advanced Climbers: Tension Grindstone MKII
- Most Adjustable Hangboard: Rock Prodigy Natural
- Best Portable Hangboard: Tension FlashBoard
Beastmaker 1000
Specs
-
Dimensions
23" x 6” -
Material
Tulipwood -
Number of holds
22 -
Best For
Almost anyone who trains on a hangboard
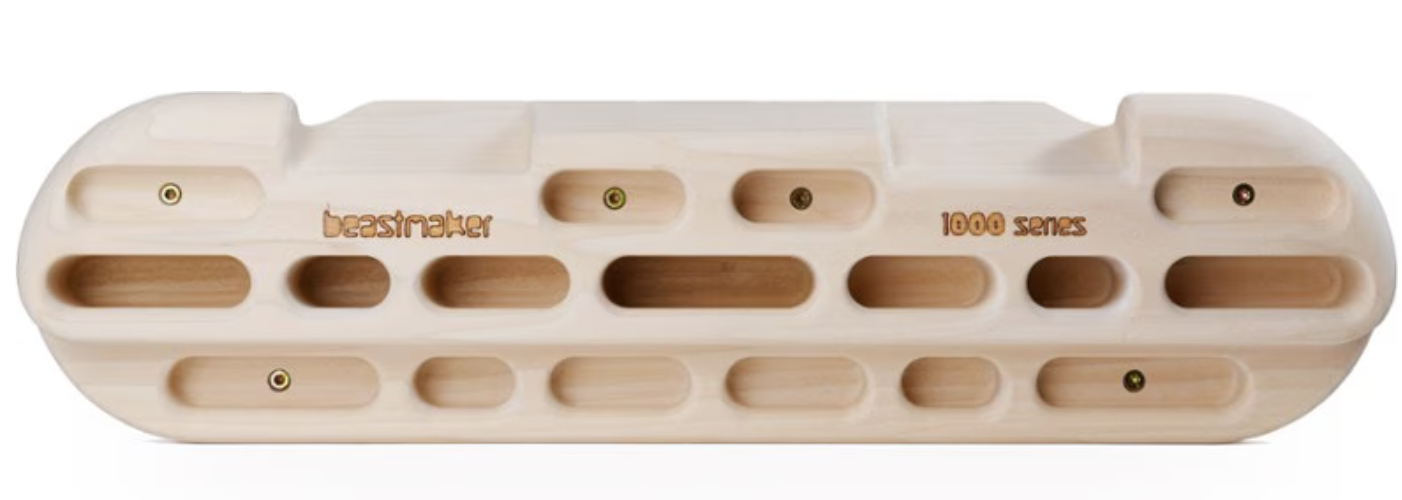
Pros
Comfortable
Skin friendly
Wide variety of holds
Good pockets
Good spacing for 20mm edge
Cons
Somewhat narrow
Lack of minimal edge holds
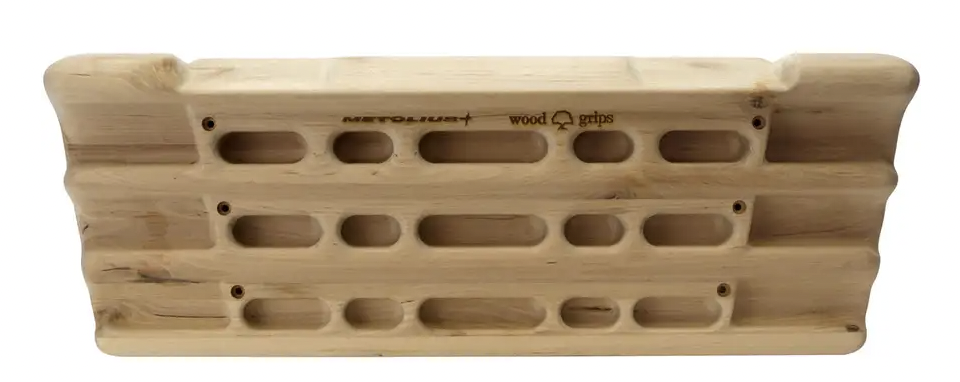
Metolius Wood Grips II
Specs
-
Dimensions
24" x 6.2" -
Material
Alderwood -
Number of Holds
18 -
Best for
Entry-level hangboard users
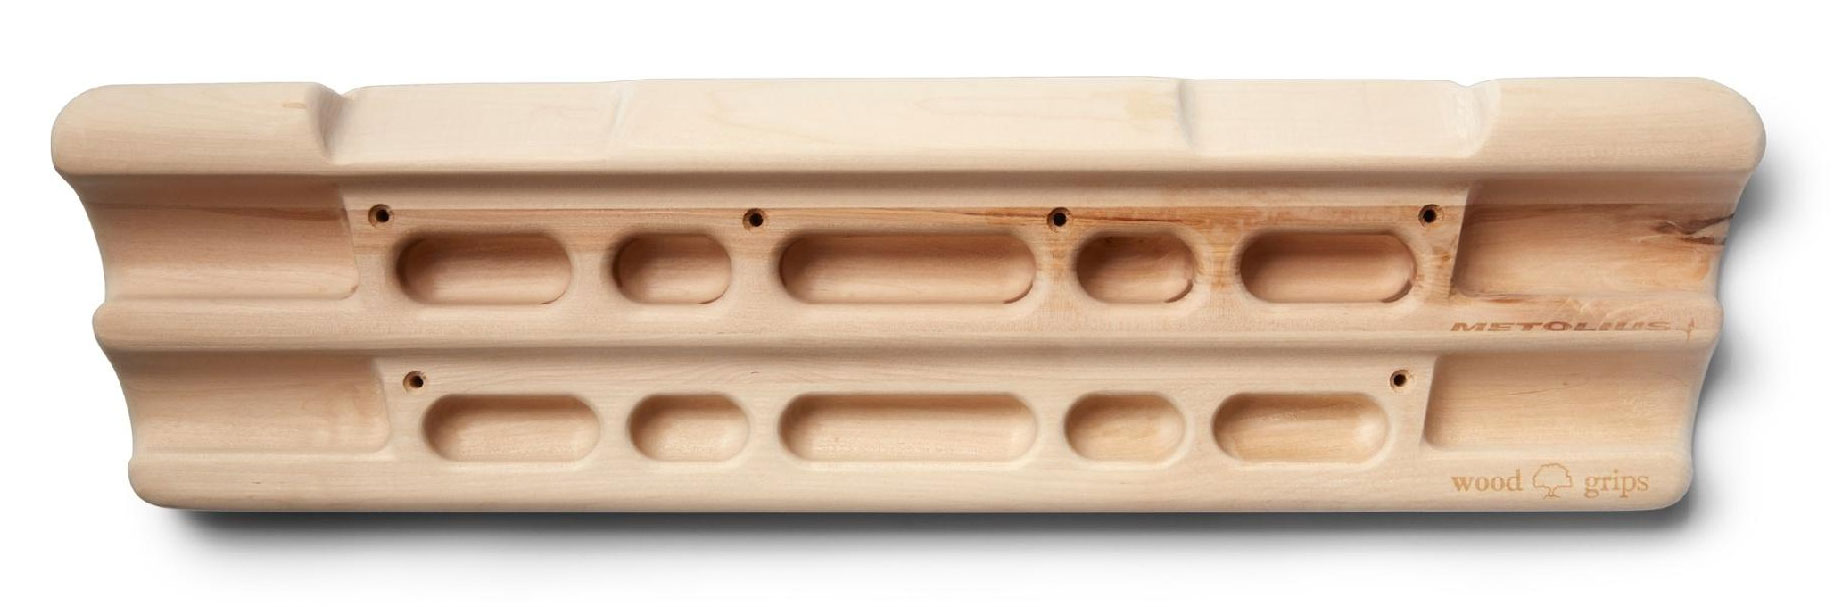
Pros
Far more affordable than most other wood hangboards
Compact size for easy mounting in tight spaces
Approachable design for beginner and intermediate climbers
Cons
Simple design lacks small holds and pinches
Not ideal for advanced climbers
Tension Grindstone MKII
Specs
-
Dimensions
27" x 7"x 3” -
Material
Poplar -
Number of holds
15 -
Best For
Experience trainers looking for a niche board
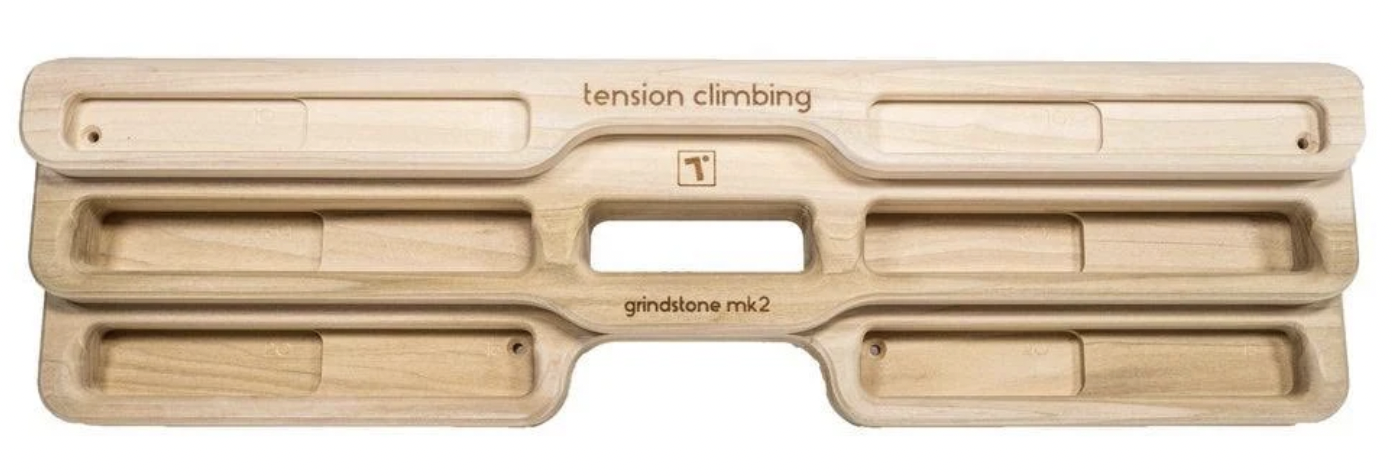
Pros
Comfortable
Tons of edges in incremental steps
Great progression for small holds
Cons
Lacking in pockets and slopers
Radius edge might reduce stated edge depth
Phone holder doesn't fit all phones
Trango Rock Prodigy Natural
Specs
-
Dimensions
7.5" x 6" (each side) -
Material
Beach wood -
Number of holds
16 (some edges are tapered) -
Best For
Most climbers
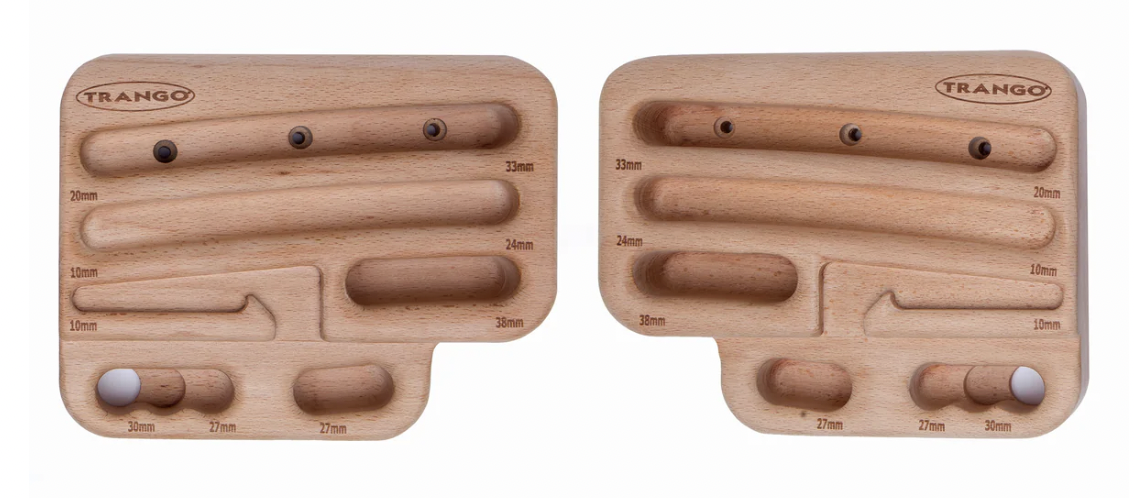
Pros
Adjustable
Sleek design
Lots of pocket and edge options
Cons
Uncomfortable jug
No distinct edge size
Super slick
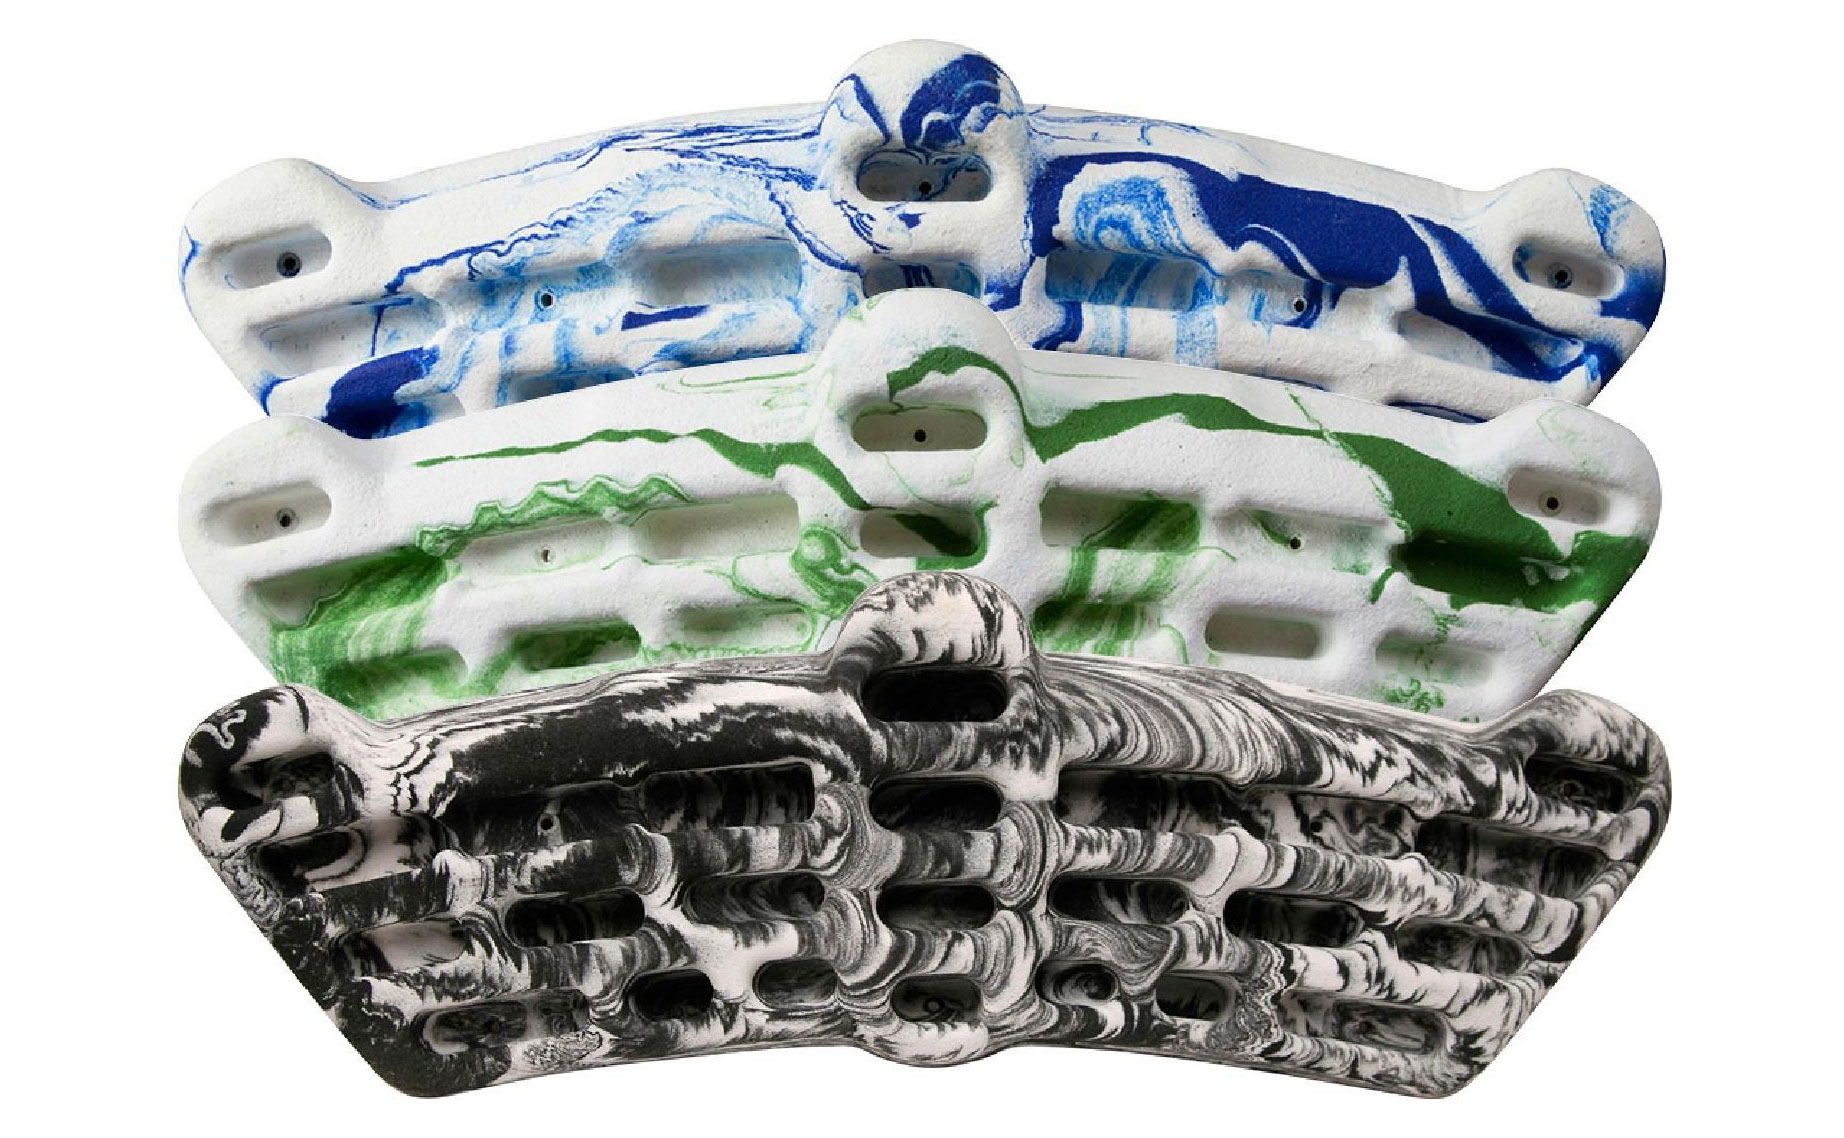
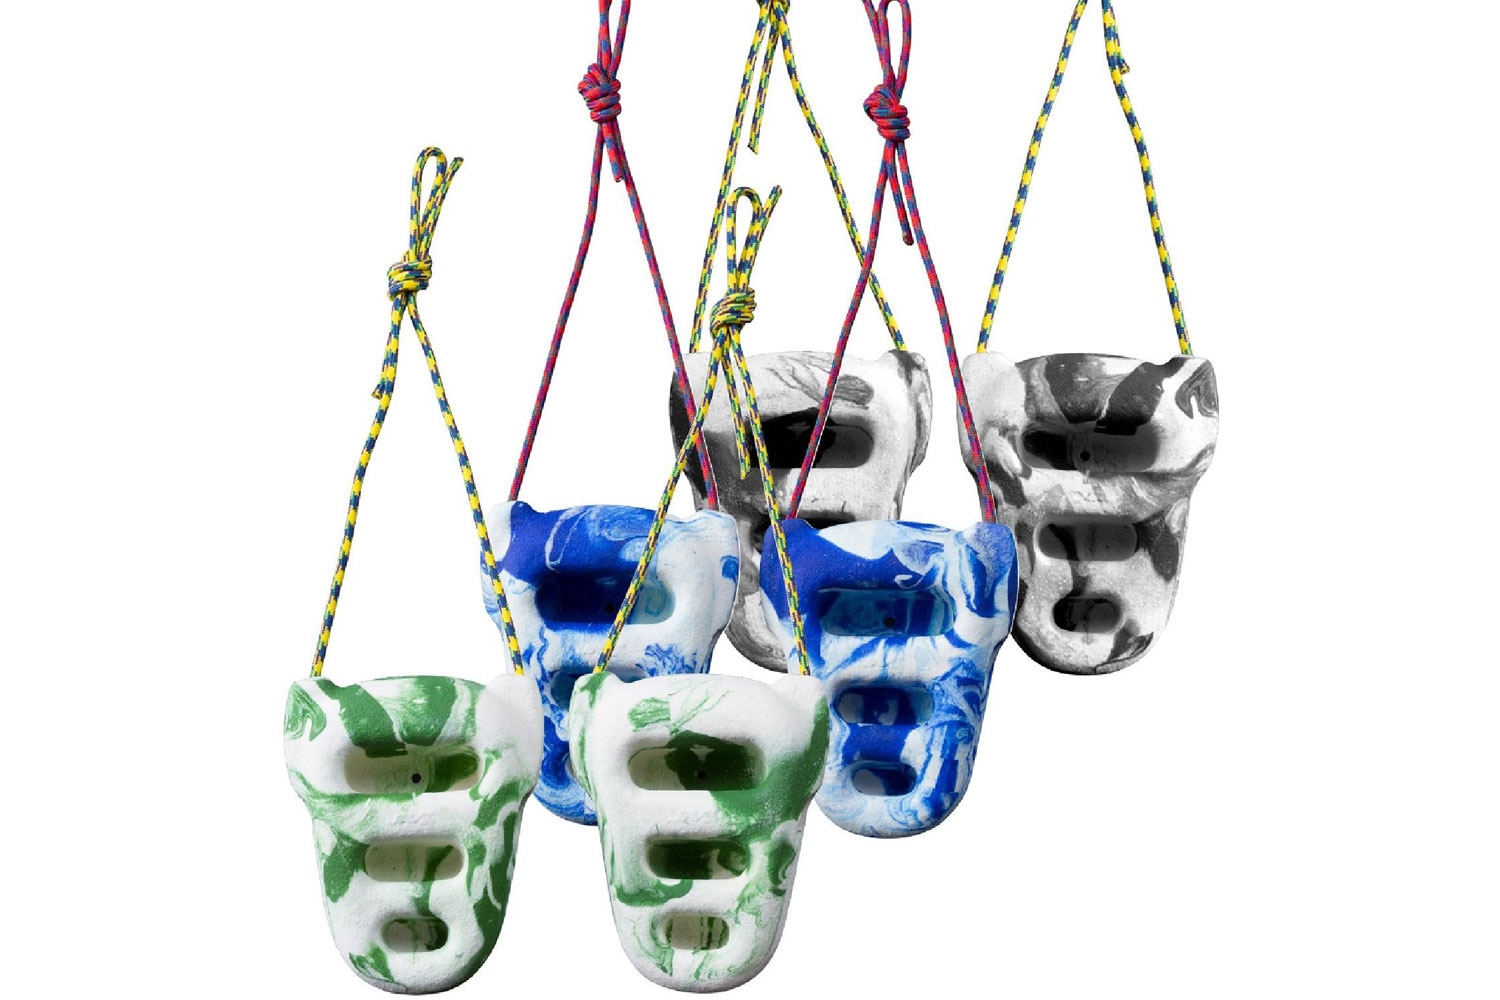
The Tension Block
Specs
-
Dimensions
7” x 6” x 2” -
Material
Poplar -
Number of holds
5 -
Best For
Climbers serious about finger training
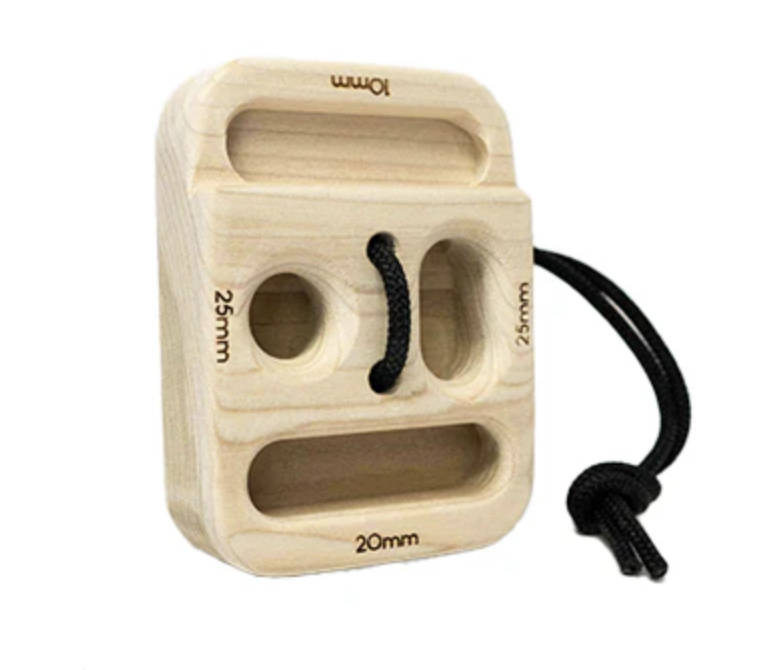
Pros
Portable
Versatile
Tons of grips in a small package
Cons
Not suitable for strengthening shoulders
Tension Flash Board
Specs
-
Dimensions
19" × 3" × 3" -
Material
Wood -
Number of Holds
8 -
Best For
Warming up
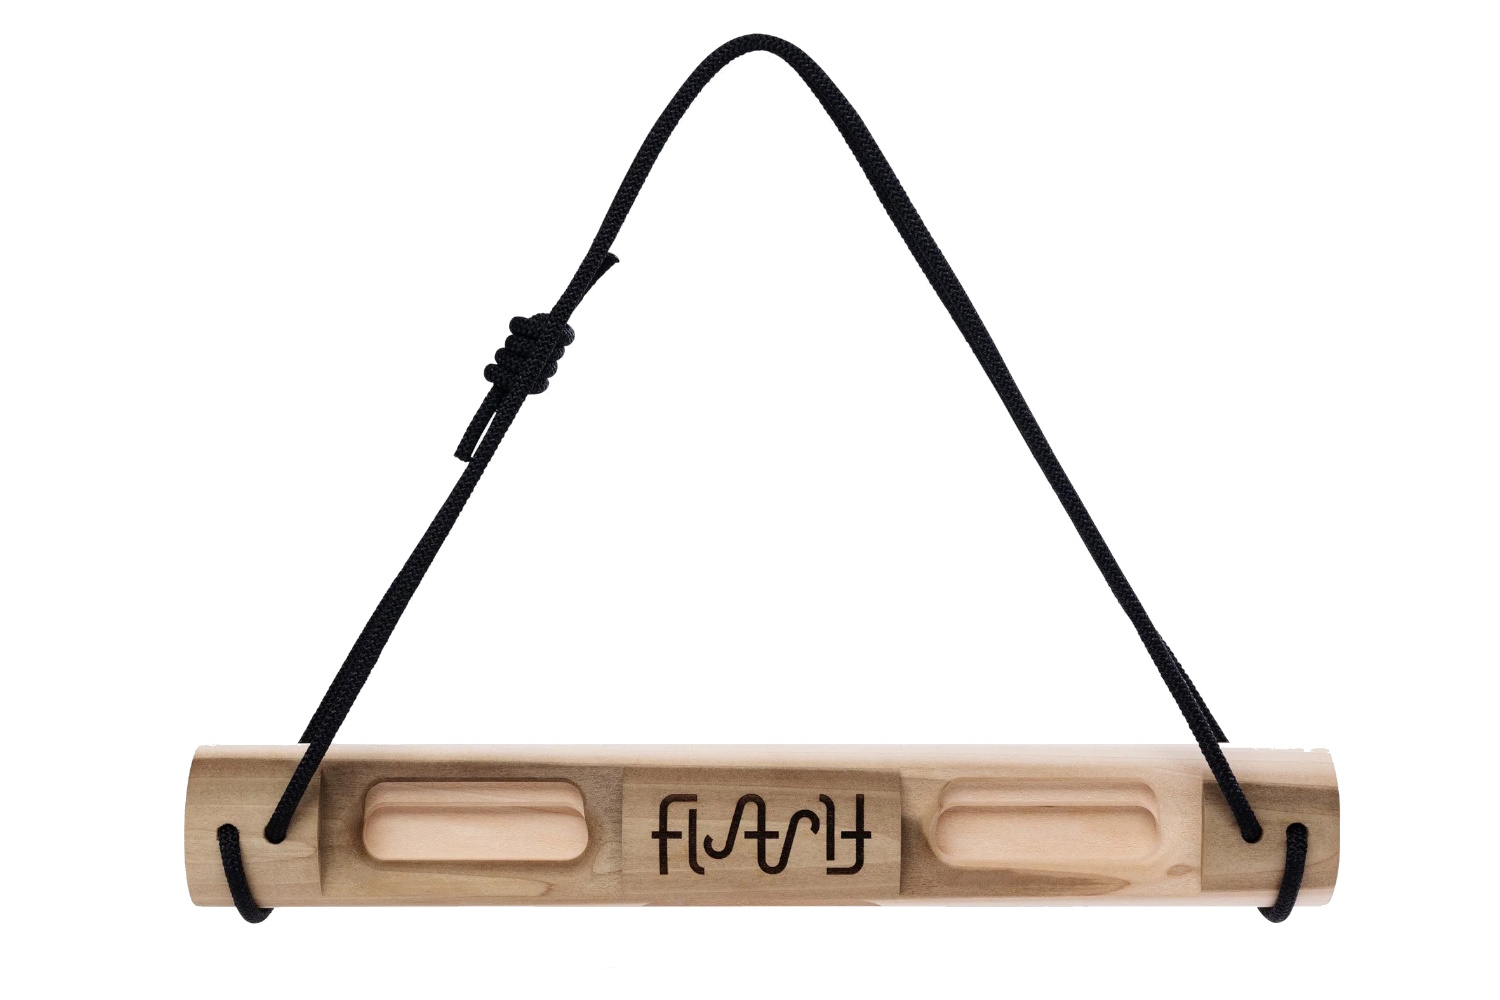
Pros
Lightweight
Portable
Well designed for warming up on the go
Cons
Minimal hold options
Metolious Wood Grips Deluxe II
Specs
-
Dimensions
24” x 8” -
Material
Wood -
Number of holds
25 -
Best for
Sport climbers looking for a wood board with solid hold progression
Pros
Comfortable
Excellent progression
Sleek and compact
Cons
Lacking in small edges and small pockets
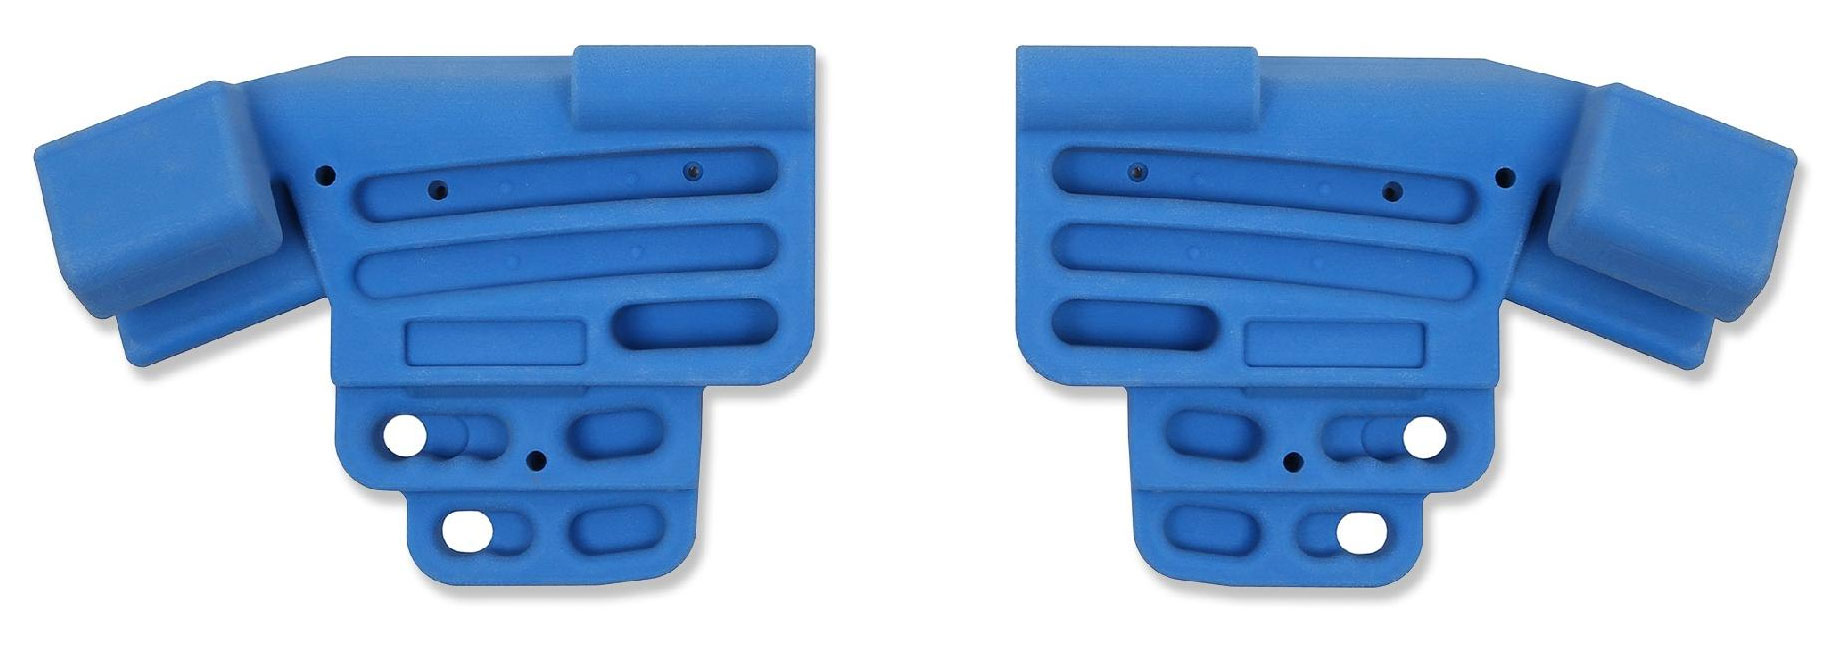
So iLL Iron Palm Training Board
Specs
-
Dimensions
27" x 11.5" x 4" -
Material
Urethane -
Number of Holds
10 -
Best for
Intermediate and advanced climbers
Pros
Great range of edge sizes for intermediate to advanced climbers
Allows user to train crimps, slopey crimps, pinches, and slopers all on the same board
Well-placed screw holes allow for secure mounting
Cons
Lacks very thin edges and challenging slopers
Trango Rock Prodigy Training Center (RPTC)
Specs
-
Dimensions
9.1” x 12.1” per side -
Material
Polyester resin -
Number of Holds
23 -
Best for
Intermediate and advanced climbers
Pros
Tons of options for holds make this an effective all-in-one board
Progression-focused design stays relevant as you improve
Hold angles and sizes are designed with joint health and injury prevention in mind
Cons
More difficult to mount than other hangboards, especially if you want to be able to change the width between sides
On the more expensive end of the hangboard market
Takes up more space than other boards
Metolius Simulator 3D Training Board
Specs
-
Dimensions
28" x 8.75" -
Material
Polyester resin -
Number of Holds
29 -
Best for
Climbers of all levels
Pros
Massive variety of hold sizes and depths
Good value
Cons
Takes up lots of space and will not fit over every doorframe
Metolius Rock Rings
Specs
-
Dimensions
7.5" x 6.5" x 2.5" -
Material
Polyester resin -
Number of Holds
4 per ring -
Best for
Pull-up exercises, traveling climbers
Pros
Affordable
Versatile, can be used for finger training, pull-up exercises, and more
Easy installation
Single-point suspension allows for joint rotation for injury prevention
Cons
Limited hold sizes and shapes
Lacks features for training slopers and other specific weaknesses
Heavy
Hangboards Comparison Table
| Hangboard | Price | Dimensions | Number of Holds | Material | Best for |
|---|---|---|---|---|---|
| Beastmaker 1000 | $129 | 23″×6” | 22 | Tulipwood | Beginner to advanced Climbers |
| Metolius Wood Grips II | $90 | 24″ x 6.2″ | 18 | Alder wood | Entry-level hangboard users |
| Tension Grindstone MkII | $155 | 23″ × 7″ × 3″ | 15 | Wood | Advanced and elite climbers |
| Trango Rock Prodigy Natural | $99 | 7.5″ x 6″ (each side) | 16 (some edges are tapered) | Beach wood | Households with multiple climbers |
| Tension Flash Board | $90 | 19″ × 3″ × 3″ | 8 | Wood | Warming up |
| So iLL Iron Palm Training Board | $100 | 27″ x 11.5″ x 4″ | 10 | Available in urethane or wood | Intermediate and advanced climbers |
| Trango Rock Prodigy Training Center | $160 | 9.1” x 12.1” per side | 23 | Polyester resin | Intermediate and advanced climbers |
| The Tension Block | $54 | 7”x6”x2” | 5 | Poplar | Warming up, precise strength progression |
| Metolious Wood Grips Deluxe II | $109 | 24” x 8” | 25 | Wood | Sport climbers looking for a wood board with solid hold progression |
| Metolius Simulator 3D Training Board | $100 | 28″ x 8.75″ | 29 | Polyester resin | Climbers of all levels |
| Metolius Rock Rings | $50 per pair | 7.5″ x 6.5″ x 2.5″ | 4 per ring | Polyester resin | Pull-up exercises, traveling climbers |

How We Tested Hangboards
There are many experienced climbers on the GearJunkie team. Collectively, we have poured thousands of hours into dangling off of tiny edges in an ongoing effort to get stronger.
For this particular roundup, Austin Beck-Doss, Matt Bento, and Paul Mandell collectively combed the entire hangboard market and carefully trained on over 11 models to compare their pros and cons. While testing, they paid careful attention to comfort and ergonomics, hold variety, versatility, surface texture, and durability. Numerous boards were carefully assessed for their ability to facilitate progression.
Austin and other folks on the GearJunkie team have been testing hangboards for years — but the process is ongoing. For this guide’s most recent update, we reassessed our recommendations and added several new boards to the lineup. As new hangboards hit the market, we’ll be sure to test and consider them for this list.
As of now, the hangboards on this list are the best available. For dedicated climbers seeking efficient sessions and successful sends, these tools can certainly help. To thoroughly evaluate hang boards, we developed a comprehensive testing process that involved the following criteria:
Fit and finish: We meticulously examined the construction and overall quality of each hang board to ensure durability and performance.
Hold type and grip options: We assessed the variety of hold types and grip options available on each hang board to gauge the versatility and suitability for different training needs.
Comfort: We paid close attention to the ergonomics and comfort level of each hang board, considering factors such as hand positioning and skin-friendliness.
Versatility: We tested the hang boards to determine their adaptability to different training routines and user preferences.
Cost: We carefully evaluated the price point of each hang board with its features and performance, ensuring that it offered good value for the investment.
Best Application: We identified the specific training scenarios and user profiles for which each hang board was best suited, taking into account factors such as skill level and training objectives.
Buyer’s Guide: How to Choose a Hangboard
The hangboard market has never been as full of high-quality options as it is right now. However, so many choices can make it difficult to actually make a selection. Here, we break it down so you can find the right hangboard for you.
Determine Your Goal
First, it’s important to think about what kind of climber you are, what kind of climber you’d like to become, and how a hangboard would best help you through the process. Although there’s a subjective element to the difficulty scale for grading climbing routes, grades can be a useful benchmark when shopping for a hangboard.
Though rock climbing requires a variety of skills, strengths, and techniques, finger strength is the ultimate key to progressing as a climber. Hangboards, with their various edges and pockets, directly target the fingers. Our best overall choice, the Beastmaker 1000, has big enough variety of holds to take you from gumby to mutant, while the Tension Grindstone MkII has very small edges for the most advanced climbers.
Climbers who scale up to around V3 boulders and 5.10 routes are generally considered in the beginner and intermediate categories. Boulders from V4 to V7 or so and routes from 5.11 to low-end 5.13 could be considered advanced. Finally, V8+ boulders and 5.13+ routes are more or less in the elite range.
While you’re shopping for a hangboard, you’ll find the manufacturer is usually clear about which category of climbers the board is designed for.
A well-maintained board can last many years or perhaps decades, even with regular use. For this reason, it’s important to view your purchase as an investment.
As you grow stronger and your training needs change, you’ll want your board to continue to meet those needs. It’s helpful to purchase a board with some hold sizes that are currently outside of your ability level, especially if you have ambitions to significantly increase your finger strength over time.

Hold Types
Almost all hangboards have some variation of a jug — another word for a large, positive, easy-to-grab hold. Beyond this, beginner hangboards have edges and pockets that range from 20 mm to 50 mm deep. These depths meet the general needs of a beginner climber entering the world of hangboard training.
When the edge depth is less than 20 mm, it’s recommended you have some intermediate- to advanced-level finger strength to train on it safely. Advanced and elite boards usually include edges and pockets that are 10 mm deep — or perhaps even less!
In addition to edges and pockets, some hangboards include pinches, slopers, and other hold types. For the beginner climber, it’s probably most important to build foundational finger strength through standard pockets, edges, and jugs. For more experienced climbers, other hold types can be a valuable addition to a board.
Slopers and pinches engage different muscles and parts of the hand and fingers, so they offer more nuanced training opportunities. Some climbers may want to train on a certain hold type as a way to prepare for a competition or specific outdoor project.
For slopers, an angle of 30 degrees and up caters to the more advanced climber. Not all hangboards measure their sloper angle. However, some, like the So iLL Iron Palm, include slopers that are fairly approachable for beginners.

Types of Material
Materials should also be a consideration when shopping for a hangboard. For the most part, there are two categories of hangboard materials — wood and polyurethane/polyester resin.
Wood has recently become popular for high-end hangboards. Most wooden hangboards are made using a CNC machine to cut out precise, repeatable grooves that will become the edges and other holds on the finished board.
The texture tends to be slightly smoother on a wood hangboard. This means less abrasion on your skin and (hopefully) fewer forced rest days due to raw fingertips.
However, not all wood hangboards have the same feel. Depending on how they’ve been sanded and finished, a wood hangboard can be super slick or super grippy. Either way, wood hangboards tend to be more expensive than boards in the other dominant category.
Polyurethane or polyester resin hangboards are made from the same material as the climbing holds that litter the walls of any contemporary climbing gym. While some resin boards are made by pouring liquid resin into silicone molds, most are produced by the same CNC process used to make wood boards.
Compared to wood, resin boards are heavy, dense, and coarsely textured on the surface. A resin board’s surface is often more abrasive than a wood board’s surface, and it can cause more fingertip wear per session.
Like wooden hangboards, resin boards need to be lightly cleaned occasionally to prevent the buildup of gunk and chalk as well as to maintain their ideal texture.
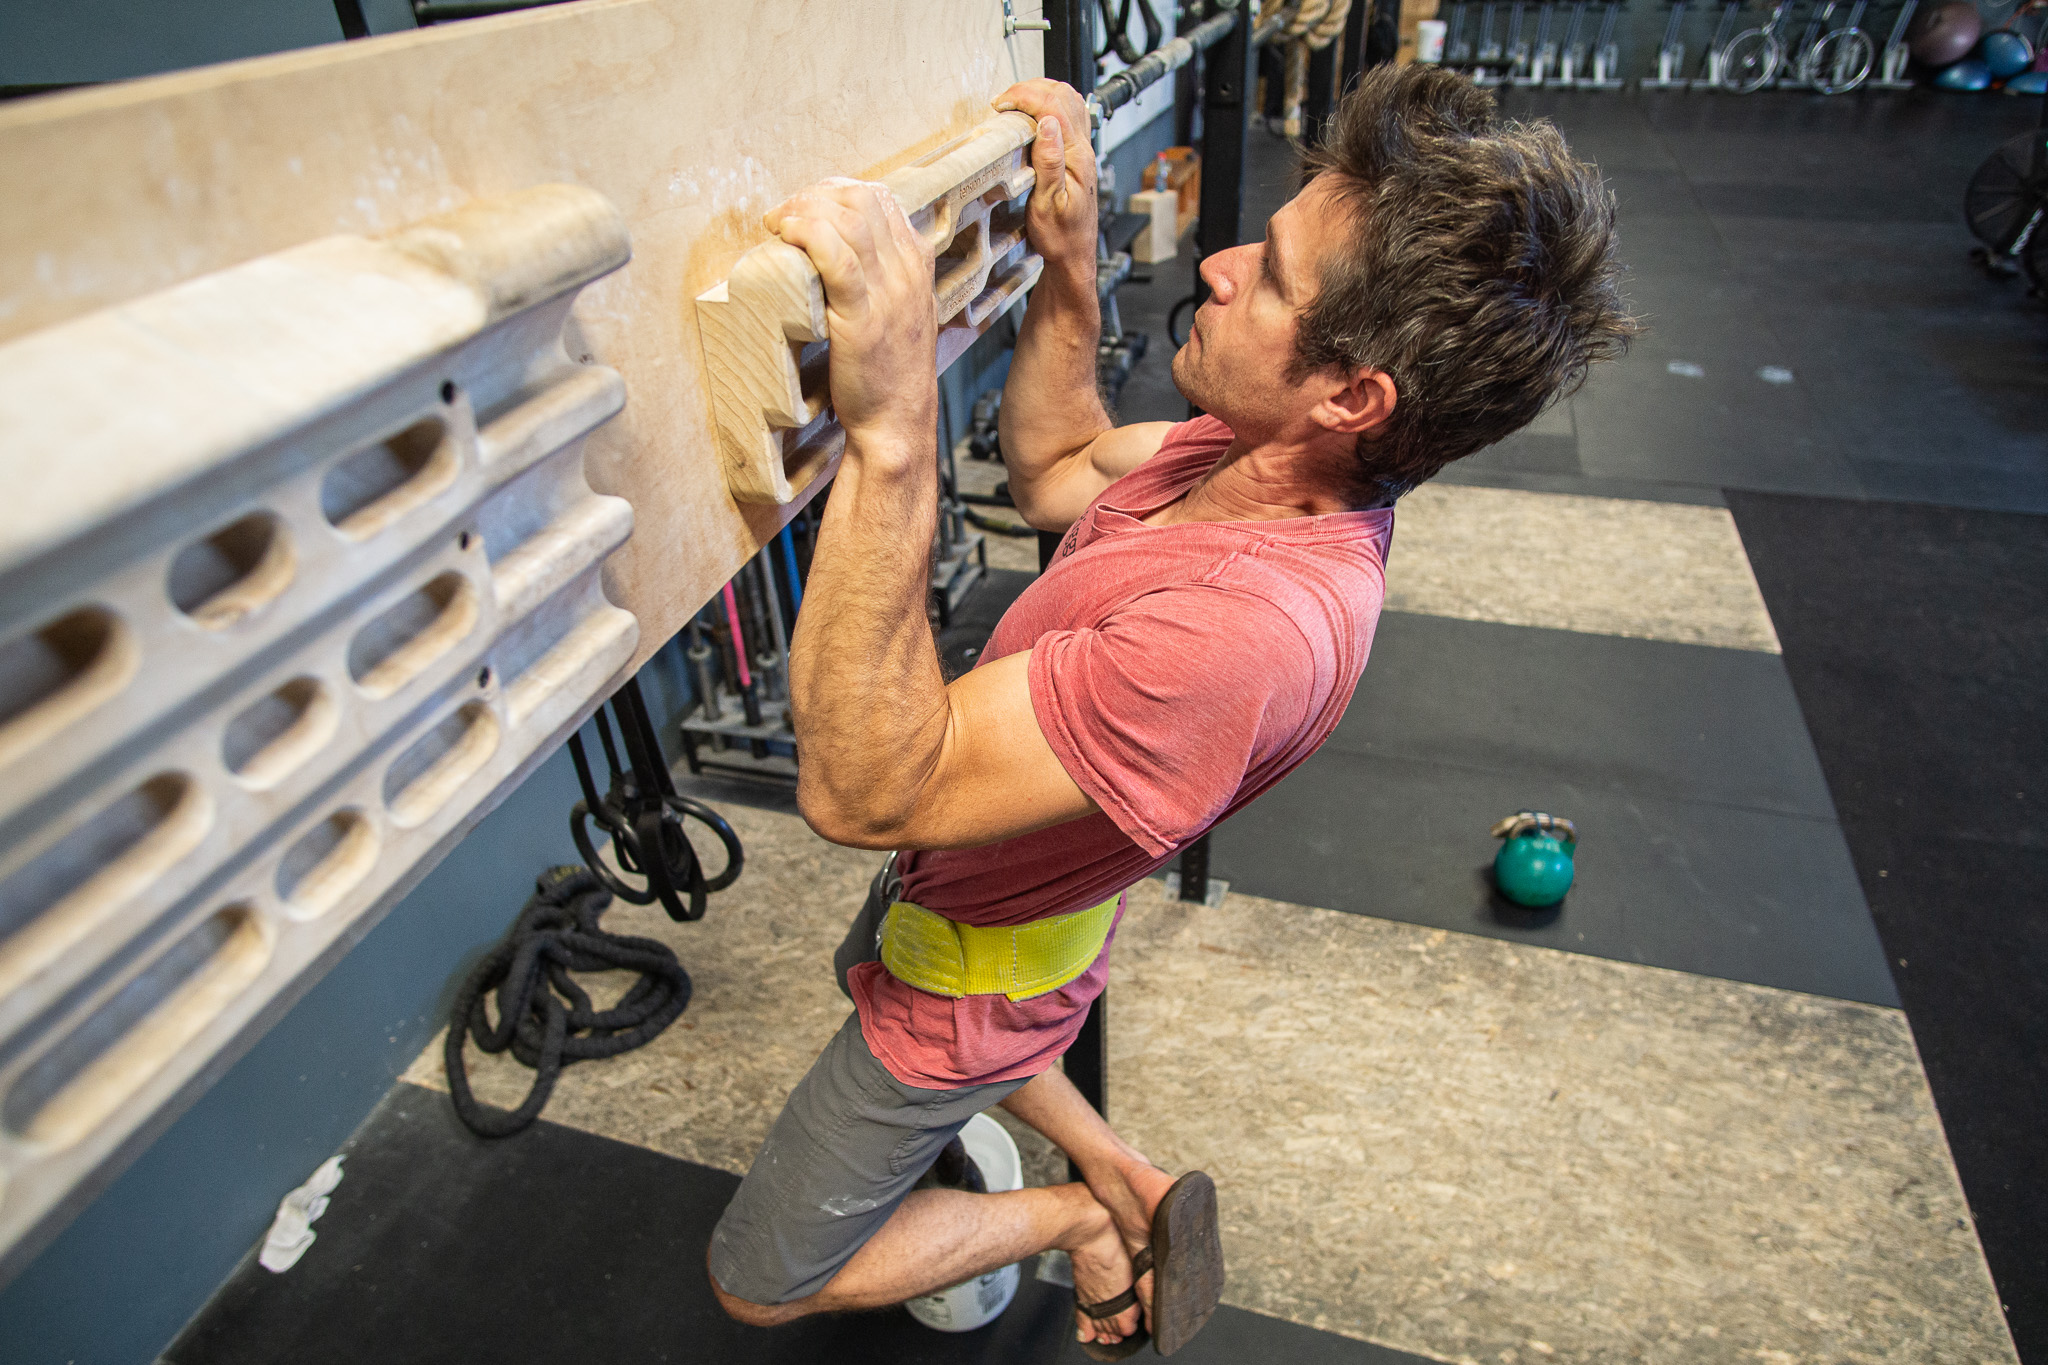
How to Hang a Hangboard
A hangboard mounted in your home provides easy access to a training session without making the trip to the gym. Most hangboards come with an instruction manual for proper installation. There are a few important considerations for mounting any board that ensure that you do it right the first time.
Choose a Great Location
Selecting the perfect location is a key step in the installation process. First, consider how it feels in the spaces you’re considering mounting your board.
You want your training area to be comfortable and pleasant enough that you don’t dread your hangboard sessions. For example, a hangboard mounted in a cold, dark garage may end up neglected simply because the setting is unappealing for training.
Once you’ve identified some good location options for mounting your board, think about how it will actually feel to train in each of them. If you’re considering mounting the board above a doorframe, make sure the height of the frame is well-suited to your body.
Do you have to jump or stand on a chair to reach your board? Do your feet drag on the ground when you’re hanging? Ideally, the top of the board should be within reach while standing on the ground with the arms slightly bent. This allows you to comfortably use every hold on the board from a standing position.
Aim to mount your board in an area with a reasonable buffer of open space. You don’t want to have to squeeze in between a sofa and a table during your training sessions. It may be helpful to have a bit of floor space near the board so you have the option to include floor workouts in future sessions.

Safety First
No matter where you choose to install your board, it needs to be safely mounted and structurally sound. You want to get strong, but you don’t want to rip your board off the wall!
If you’re mounting your board above a doorframe or to another part of your home, locate the studs, or internal framing, of your wall of choice.
A few items that will come in handy include a power drill, a level, a stud finder, proper hardware, a backing board, and a variety of drill bits. A backing board is a solid piece of wood measuring 1-2 inches thick that serves as the surface to screw your hangboard onto.
The dimensions of your backing board should be slightly larger than your actual hangboard in both length and width. You want the entire hangboard to fit on the backing board without sitting over the edges. A backing board allows you to minimize the number of holes you drill into your wall or mounting surface.
Once you know the location of your studs or other structural elements, mark them clearly with a pencil. As you decide on the position of both your hangboard and your backing board, use the level to make sure the hangboard is fixed in a perfectly level position.
The backing board is screwed directly into the studs, creating a solid mounting surface for your hangboard. You can trace the outline of your hangboard onto your backing board to ensure perfect positioning when mounting. Before you begin the actual mounting process, double-check all of your elements fit exactly as you want them to.
Time to Install the Hangboard
It’s helpful to have an extra set of hands available to hold things in place while you screw them in with your power drill. Use long screws to mount the backing board to the centerline of the studs as you marked them.
With the backing board in place, align your hangboard with the outline you drew on the backing board. Then begin to screw the hangboard into place. Use shorter screws that will not go all the way through the backing board and into the wall itself.
Most hangboards are made with screw holes already in place. It’s best to use every screw hole for safe, solid mounting. If the board comes with hardware, use it! If the board comes with instructions for installation, refer to those throughout the process.
Finally, with your board in place, try it out. Congratulations! The first step toward at-home finger strength training is complete.
Stay-at-Home Climbing Training Tips
Throughout the pandemic, many climbers have been unable to access climbing gyms and training centers. For this reason, at-home climbing training recently experienced an all-time peak. Climbers around the world are coming up with creative, effective methods of staying strong and pursuing improvement from the safety of their own space.
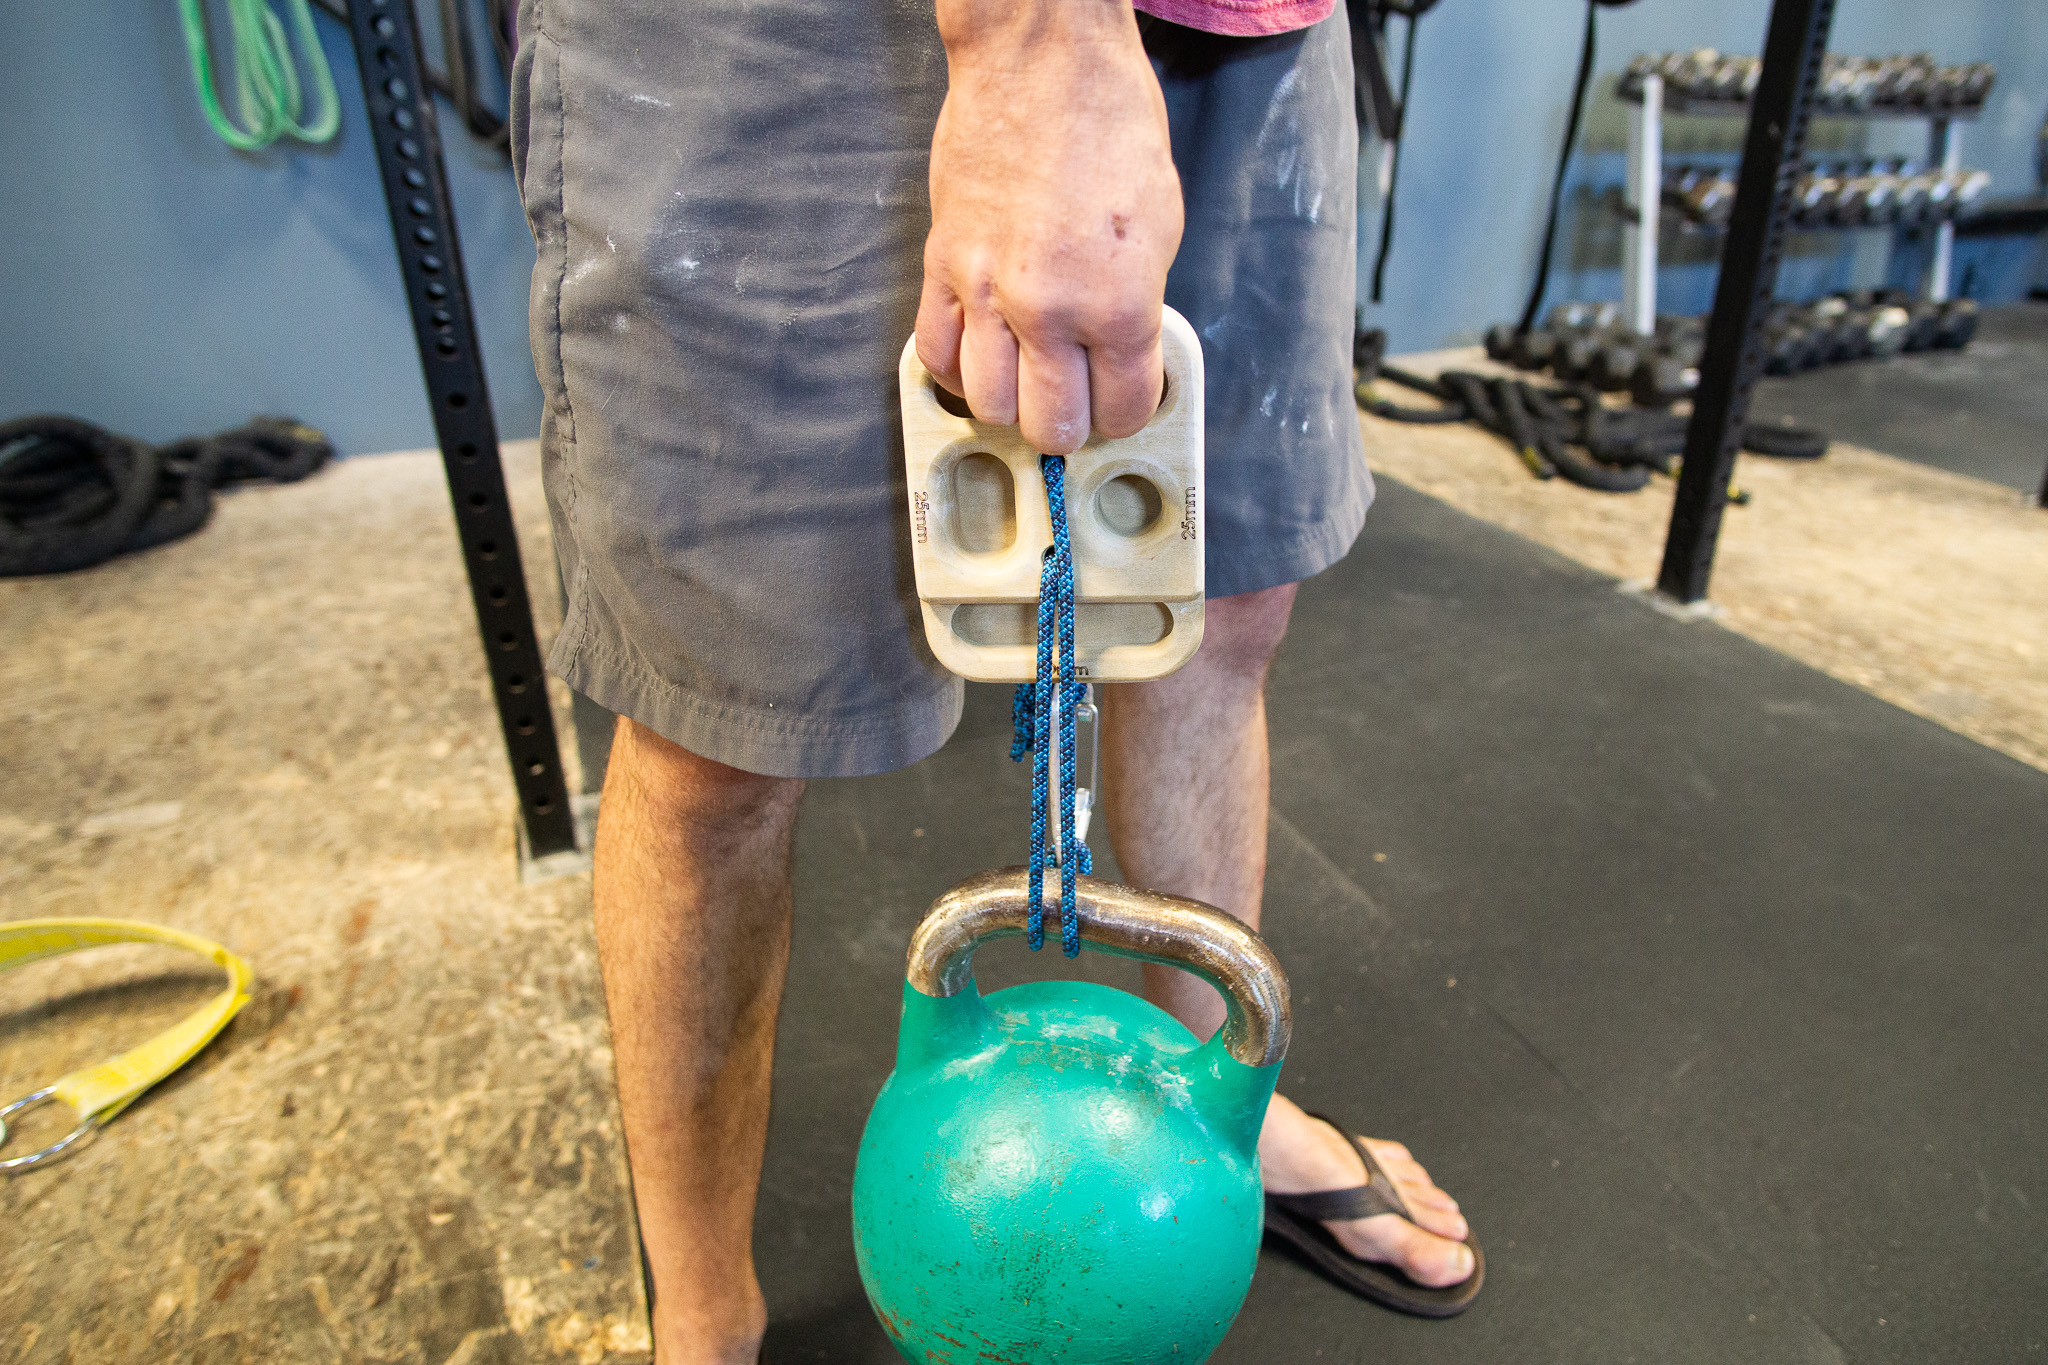
From kettlebells to medicine balls, lots of pieces of equipment can add value to an at-home training session. For climbers, the hangboard stands alone as perhaps the most effective training tool. Once you’ve got your setup ready to go, the training options that a good hangboard provides are endless.
Evaluate Your Abilities
First, it’s crucial to understand your current abilities, strengths, and weaknesses so you begin your at-home training at an appropriate level. It’s better to start slowly and lean toward the conservative side of things rather than to jump in too quickly, train too hard, and injure a finger or a shoulder in the process.
For example, you can start on the larger holds on your board and work up to the smaller holds. Begin with shorter duration hangs and train up to longer ones. With patience, your hangboard can be a safe and effective source of improvement.
Create a Training Plan
When training at home, it can be difficult to maintain a focused and consistent practice. It may be helpful to schedule your training plan in advance. This way, you aren’t relying on the hope that the inspiration to train will come suddenly and naturally.
Also, it can be helpful to keep notes of your sessions. What exercises did you do? How long did you do them for? Look for progression in your results over time, and use this progress to build motivation and confidence.
Keep Yourself Motivated
It’s not always easy to remember that there is a connection between the monotony of dangling from a hangboard and the joy you receive from climbing. To maintain this all-important link, put up some photos of your favorite climbing area or a specific project above or around your hangboard. You’re training for a reason, and it’s helpful to keep that reason in mind.
Start Simple and Scale
There are endless variations of effective hangboard protocols and programs. However, it’s wise to begin with a simple set of exercises so you don’t get lost in the sea of possibilities — especially for beginners. Included here are a few foundational hangboard exercises to try out as you begin to get the hang of training at home.
Standard Two-Arm Hang
This is the bread and butter of hangboard training. Find two holds of the same size and depth on your board. With one hand in each hold, hang with your shoulders engaged and your elbows slightly bent. For safety, the position of the fingers should be slightly open and not maximally engaged in a full-crimp position.
The full crimp, which involves raised knuckles and placing the thumb on top of the fingers while pulling on a climbing hold, can result in a finger injury. While some climbers choose to use a full crimp while hangboarding, caution is advised.
For the standard two-arm hang, begin with a duration of between 5 and 10 seconds. Between repetitions, rest for at least a full minute. This exercise is hangboarding at its most simple.
For those brand new to hangboard training, the standard two-arm hang is a good place to start building foundational finger strength. A session may include three to 10 reps of the two-arm hang, although you can alter the number of reps and duration as needed.

Offset Hang
The offset hang involves placing the hands offset on two different holds on the hangboard, with one hand significantly higher on the board than the other. For example, place the left hand on an edge somewhere low on the board and the right hand up high on a larger hold, such as a jug. Typically, the higher hand should utilize a larger, less strenuous hold, and the lower hand should pull on a smaller hold.
The offset hang mimics a body position often used while climbing when one hand is above the other. Hang in this position with the shoulders and elbows engaged for 5 to 10 seconds. Rest at least a minute between repetitions and alternate hands between each rep. Complete four to 10 total reps per session.
One-Arm Hang
The one-arm hang is a more advanced exercise that should be reserved for intermediate to advanced climbers who have developed climbing-specific strength and technique over time.
Select a hold and hang with your core, shoulder, and elbow engaged for 2 to 10 seconds. Use your core to keep your body from swinging and maintain a static, controlled position. Complete between two and five repetitions on each side per session.
These three exercises are simply a possible starting place for your at-home hangboard training. Over time, you can increase the number of repetitions and duration of each hang.
There are other ways to make these exercises more strenuous for advanced climbers, such as adding weight with a weight vest or a harness. There are lots of other exercises out there, so continue to seek the best hangboard protocol for your specific goals as a climber.
Mix It Up
In addition to the hangboard, several other training implements can round out an at-home training center. Grip strengtheners, which come in various forms, are a great and simple way to develop hand and finger strength between hangboard sessions.
These small, portable devices are easy to use while watching a movie, or even while commuting. Cheap and effective, these devices can be a useful way to begin training while you figure out which hangboard to purchase.
Yet another option is the pegboard, a simple option that climbers sometimes use to develop general fitness and foundational upper-body strength. A pegboard is a wall-mounted board with a series of small, round holes. The climber moves up the board by placing pegs, one in each hand, into the holes, typically with their feet dangling below.
The pegboard is not as strenuous on the fingers as the hangboard. So, it can be a good option for climbers who are working to build up their base of strength before shifting their focus to their fingers.
Additional Resources
If you’re looking to perfect your climbing toolkit, don’t forget to check out our in-depth reviews on the best climbing shoes for men and women.
For more information on how to maximize your hangboard’s training benefit, many excellent and thorough resources are available. Several training books delve deeply into the process of structuring an effective hangboard protocol.
These books were written by climbers for climbers. These resources can offer answers to questions that will undoubtedly arise as you explore the path of hangboarding and climbing-specific training.
Our Book Recommendations
Training for Climbing: The Definitive Guide to Improving Your Performance
This book is a high-quality resource. Drawing on the latest research in climbing nutrition and training, this bestseller presents a comprehensive and evidence-based program for improving climbing performance.
Veteran climber and sports scientist Eric Horst has been writing training manuals for decades, including the groundbreaking “How to Climb 5.12.” In “Training For Climbing,” Horst covers topics such as energy system training, developing power endurance and aerobic endurance, and injury prevention.
The Rock Climber’s Training Manual
For climbers of all ability levels, this book offers concrete methods for both immediate and continuous improvement. “The Rock Climber’s Training Manual” expands on the well-regarded Rock Prodigy training method many elite climbers have utilized. Whether you climb 5.8 or 5.15, this book offers proven exercises that can effectively guide your training.
The Rock Warrior’s Way
“The Rock Warrior’s Way” focuses specifically on improving mental strength for climbing. Mental training is covered far less often in climbing literature compared to physical training. However, this is an all-important aspect that can unlock a climber’s full potential.
Author Arno Ilgner draws on sports psychology and his deep experience as a climber to offer guidance on motivation, risk assessment, and mental focus. Mental training can be a particularly beneficial counterpart to hangboard training, resulting in a well-rounded climber with all the tools necessary to meet their goals.
Price & Value
Hangboards are a very basic, relatively inexpensive training tool. While we’ve heard murmurs of Bluetooth connectivity and force and weigh sensors making their way into hangboards, we haven’t tested any as of yet. Currently, prices range from around $50 for a portable training block, all the way to $160 for the Anderson Brothers’ Rock Prodigy Board, which is a good choice if you have no access to a climbing gym.
Budget
The Tension Block ($54) is probably the least expensive and simplest way to get your fingers in shape. You’l need to find some weight to attach as you progress, but you won’t need to mount a board anywhere in your home. To train the whole chain from fingers to shoulders, you’ll need a full board, and the Metolius Wood Grips II ($90) is the least expensive option.
Mid-tier
Most of the boards in this guide sit in the mid-tier price range ($100-150), including our best overall choice, the Beastmaker 1000 ($129). These boards include a bigger variety of holds, including pockets and slopers, and sometimes a place to put your phone as you watch the seconds count down. These boards are consistently smoother and more skin-friendly to help maximize your training ability.
Premium
The most expensive board in the lineup is the Trango Rock Prodigy Training Center ($160). This hangboard was designed while one of the brothers was in the military and couldn’t train in a gym, and it shows. It’s got multiple pinch grips, pockets, and tapered edges. It’s a very good option for folks with no access to a climbing gym. We also like the easily adjustable Rock Prodigy Natural.
Frequently Asked Questions
The best hangboard to purchase is the one that meets the needs of your current ability level, offers room for growth into the climber you want to become, and also fits your budget.
If you’re a beginner-level climber, purchase a board with plenty of larger hold sizes and shapes, including large jugs. Be sure that other hold options will be usable when your finger strength and hangboarding ability develop further.
Advanced climbers should look for a board that offers demanding hold shapes and types. If you’re training for a certain route or boulder that has a lot of a certain type of hold, make sure your new board includes similar holds.
The price range of available hangboards is broad. Expect to pay over $100 for the high-end models. Wood hangboards tend to be more expensive than resin boards.
Hangboard sizes also vary quite a bit. Measure the location where you plan to install your board before you purchase it and make sure the board’s dimensions work for you.
Hangboard training can put a lot of strain on sensitive joints and tissues like tendons and pulleys. So, it’s important to be aware of safe hangboarding practices before starting a program, especially as a beginner or intermediate climber. There is much debate around whether beginner climbers — especially young, actively growing climbers — should be hangboarding.
Regardless of your experience level, proper hangboarding technique is very important for injury prevention. Generally, the muscles in the shoulders should not sag and the elbows should be slightly bent to engage the forearms. Keep your back straight rather than arched, especially if you choose to add extra weight to your hang.
If you are a beginner considering starting a hangboard program, use lots of caution and keep your focus on safety. Tendons and connective tissues are slower to strengthen than muscles. Stronger fingers will come, but a beginner’s focus should be on safety and injury prevention.
No. It’s not wise to hangboard every single day. Hangboarding puts a lot of strain on the tendons and connective tissues in the fingers, forearms, and hands.
These tissues require recovery periods between stresses. Sufficient rest between sessions is important for both injury prevention and effective recovery.
Typically, climbers should simply focus on actual climbing during the first 6 to 12 months of participation in the sport. This allows the body to work up the stresses of climbing and helps prevent long-term injuries.
Fundamentally, the hangboard is used to strengthen the fingers’ pulling and grip strength for climbers seeking to progress their ability to complete more difficult rock climbs. To use one, hang from holds on the board with your shoulder and elbow joints engaged. The elbows should be slightly bent. Avoid hanging with your shoulders next to your ears.
When hangboarding, it’s recommended most climbers use an open-handed or half-crimp hand position. These hand positions avoid the full crimp, which positions the knuckles above the fingertips and wraps the thumb on top of the fingertips. The full crimp creates a significant potential for injury in the tendon and pulley tissues.
Between each repetition of hanging, take sufficient rest to allow the fingers to recover. It’s recommended to take at least a day of rest between hangboard sessions.
Beginner climbers should focus on actual climbing to progress. If this isn’t possible due to limited access to gyms or crags, the hangboard and other tools can offer helpful climbing-specific training.
By incorporating hangboard sessions in your at-home training, your fingers will become stronger at pulling and gripping climbing holds. Over time, you’ll gain the ability to utilize smaller climbing holds, a feature of many difficult rock climbs.
Along with your hangboard training, core exercises, stretching, and even some cardio can all benefit your climbing performance. A well-rounded climber should have a solid fitness base to lean on.
Even if your access to the gym or the crag is currently restricted, intentional workouts with a focus on climbing-related skills can allow you to progress as a climber. When the time finally comes to return to actual climbing, you’ll be ready!

The Best Climbing Shoes of 2024
Aside from the ice climbers, mountaineers, and Charles Albert, every climber needs a pair of reliable climbing shoes.

The Best Climbing Helmets of 2024
Whether you’re headed to the sport crag or a distant alpine big wall, every climber’s kit should include a helmet.
The post The Best Hangboards of 2024 appeared first on GearJunkie.
primer-8